vps
日期:2024-01-27
归属:CC-BY-NC 4.0
存档:2023-05-01
如果你有一些,或者正在进行着记录、创作,无论是文字、图片还是音频、视频——像档案一样归类、保存它们,再使用流行却陌生的「生成式网页」工具,从你的文本文件和媒体文件生成Web页面,上传到云端,你便可以在空中有一块土地。你可以一砖一瓦地建造,亦或是重建。也可以在其中任意移动、偶尔清扫。对你来说,它是你的文件的备份,历史内容的归档,归属关系的证明。对于别人来说,它是高可信度的来源,目录化、图形化的可读、可视事物。
从「生成式网页」到「静态内容托管」,是很好的入门选择。例如从Hexo、Hugo等网页框架选择一或多个主题模板,通过Github Pages等服务,或者Vercel、Netlify等平台来构建和部署站点。
Hexo中更多的是博客模板,我最早使用了几年的Icarus,也较喜欢Stellar的风格。Hugo有相对丰富的主题,例如图墙模板的AutoPhugo、Gallery Deluxe、Hugo Split Gallery,食谱模板的recipe-book等等,也较容易修改源码。
而「部署到VPS」几乎是一门古代技术,此文即是这条古老却生僻的路线的徒步记录。主要途径「多个二级域名」、「开启HTTPS」,以及「本地Build」「云端Build」两种部署方案,涉及到了不少Unix系统上的基础操作。
而我之前买的VPS再不使用的话,就要到期了。最终,在那样一个原生环境下,低性能的VPS配置理应会有相对良好的性能。具体情况下,它又受到了VPS性能、网络运营商、CDN资源(Web字体等)、大型媒体文件(图片、音频、视频)等因素的影响。
选购VPS#
「旧笔记」
这里沿用了2021年的笔记,使用的是腾讯云VPS。随着平台后续的更新,具体的操作可能已经变化,但流程差不太多。选择其他云服务商也没什么问题。
- 注册腾讯云帐号 → 实名认证
- 购买云服务器
- 域名注册
- 域名 → 操作 → 解析 → 记录管理 → 添加记录 …
- 网站备案 → 我的备案 → 网站信息 → 新增网站 …
- 留意核验短信
备案时,需要让站点页面可以被访问。这个步骤可以放在最后。完成备案后会有年审(吧),每次年审会检查(主域名的)页面的底部是否有备案号链接,以及网站名称是否和提交的信息一致。
VPS上安装系统#
我最早使用「Ubuntu + Nginx」的组合,后来听说「CentOS + Apache」的性能会更好。Rocky Linux则是一个由社区支持的CentOS的代替品。
腾讯云 → 控制台 → 云服务器 → 实例 → 目标实例 → 操作系统 → 重装系统 → 重装配置:
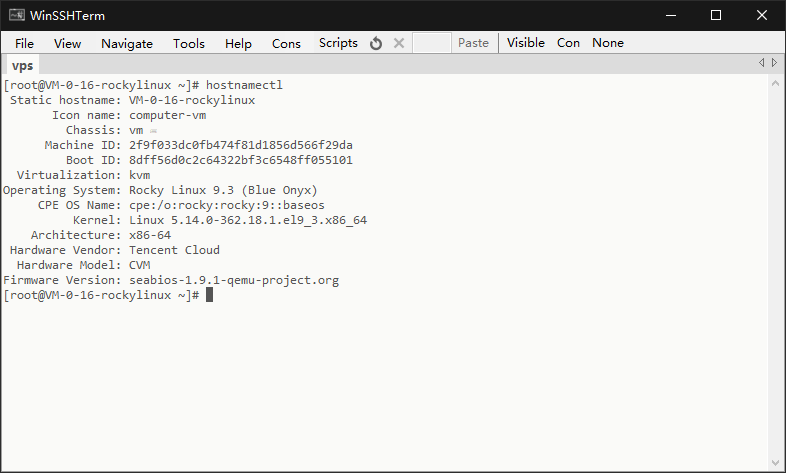
登录VPS#
目标实例 → IP地址 YourHost (公) → 复制
我使用的SSH工具箱是WinSSHTerm。也可以选择WindTerm、electerm、MobaXterm等。
WinSSHTerm → Connections → Connect → Add Connection:
双击vps → PuTTY Secutity Alert → Accept
更新系统软件包#
显示系统信息:
更新所有软件包,确认时默认Yes:
Apache上配置(多)站点#
安装Apache:
在Rocky Linux的文档中,为了防止一个网站出问题时影响其他网站,网页的配置采用了稍复杂的文件结构。
使用Vim编辑器编辑Apache的配置文件:
按PageDown定位到末尾。按i进入Insert模式,在新的一行,粘贴下面这行。在WinSSHTerm中可以右键粘贴:
按Esc退回Normal模式。按:进入Command模式,继续输入wq并回车,即write(save)并quit。
这里,文档将网站的配置文件新建在了sites-available/下,再通过系统链接,可选择地复制到sites-enabled/。文件夹中,以com.Example.www, com.Example.SubDomain(子域名)的风格来命名。且主域名的文件放在/var/www/html/,各个子域名的放在各自的/var/www/sub-domains/SubDomain/html/。
进行以下操作时,根据你的实际域名,替换掉Example.com, SubDomain等示例名。
新建并配置域名:
<VirtualHost *:80>
    ServerName www.Example.com
    ServerAlias Example.com
    DocumentRoot /var/www/html
    DirectoryIndex index.php index.htm index.html

    CustomLog "/var/log/httpd/access_log" combined
    ErrorLog  "/var/log/httpd/error_log"

    <Directory /var/www/html>
        Options -ExecCGI -Indexes
        AllowOverride None

        Order deny,allow
        Deny from all
        Allow from all

        Satisfy all
    </Directory>
</VirtualHost>
新建并配置二级域名:
<VirtualHost *:80>
    ServerName SubDomain.Example.com
    DocumentRoot /var/www/sub-domains/SubDomain/html
    DirectoryIndex index.php index.htm index.html

    CustomLog "/var/log/httpd/SubDomain-access_log" combined
    ErrorLog  "/var/log/httpd/SubDomain-error_log"

    <Directory /var/www/sub-domains/SubDomain/html>
        Options -ExecCGI -Indexes
        AllowOverride None

        Order deny,allow
        Deny from all
        Allow from all

        Satisfy all
    </Directory>
</VirtualHost>
新建文件夹:
启动Web服务:
通过「新建或删除系统链接」,来开启或关闭站点。这里是开启:
ln -s /etc/httpd/sites-available/com.Example /etc/httpd/sites-enabled/
ln -s /etc/httpd/sites-available/com.Example.SubDomain /etc/httpd/sites-enabled/
每次编辑过站点配置,或者开关了站点后,重启Web服务:
去到腾讯云 → 控制台 → 云解析DNS → 我的解析 → 目标域名/解析 → 添加记录:
对于主域名,添加两条记录:
对于子域名,新增记录:
在浏览器中确认Example.com、SubDomain.Example.com。如果顺利,将看到:

↪ Apache web server multiple site setup
↪ What ServerAlias for my Subdomain?
防火墙设置#
在防火墙上,永久地打开公域的80和443端口,对应访问网站使用的HTTP和HTTPS协议。
firewall-cmd --permanent --zone=public --add-service=http
firewall-cmd --permanent --zone=public --add-service=https
firewall-cmd --permanent --add-port=80/tcp
firewall-cmd --permanent --add-port=443/tcp
firewall-cmd --reload
firewall-cmd --list-all
↪ How to install Apache on Rocky Linux 9
↪ firewalld for Beginners
↪ mod_ssl on Rocky Linux in an Apache web
配置SSL证书#
使用certbot来配置域名的SSL证书,启用HTTPS访问。安装软件包:
dnf install epel-release -y
dnf install certbot python3-certbot-apache mod_ssl -y
systemctl restart httpd
申请证书:
回答3个问题:
- 填入一个你的邮箱来接收重要信息
- 阅读并接受用户协议的条款。我没有读,你可以读一读
- 是否愿意分享你的邮箱地址给它的一个合作伙伴、非盈利机构
如果顺利,这里会列出Web服务中开启的域名:
输入数字,以空格间隔即可,如1 2 3。如果是以后新增一个域名,这里只需输入新域名的数字。
只是测试一下证书的续订功能是否正常:
↪ Generating SSL keys - Let’s Encrypt
选择部署方式#
到此,如果你能够上传网页文件到对应的文件夹,就可以进行访问了。这个步骤,网络上有许多不同的方法和工具。例如,对于Hexo,可参考One-Command Deployment,对于Hugo,可参考Hosting and Deployment。我试过SiriKali、cwRsync等等,最终使用Gitbub Actions在云端进行构建,再部署到Gihub Pages和VPS。
本地Build#
这个方法源自Deploy Hexo sites to VPS。原文写于2015年,链接在几年前失效,我在Internet Archive上找到了存档并保存了副本。
安装和配置Git(PC上)#
在PC上,安装分布式版本控制系统Git。注册一个GitHub账号。打开终端,配置本机上的Git的用户信息:
生成SSH密钥对,用来与远程Repo通信:
在浏览器中打开Github的SSH and GPG keys设置,选择「New SSH key」。复制C:\Users\YourName\.ssh\id_rsa.pub里的内容, 粘贴进去。密钥的名字随意,当你看到名字,能够知道是哪台设备即可。
测试与GitHub的SSH连接:
这里的ssh.exe位于Git安装目录的\usr\bin\内,不是其他的ssh.exe。可以通过where ssh检查。
新建本地Repo(PC上)#
新建一个Repository,名称可以与你的网站有关。Repo默认「公开」,对所有人可见,这样也便能够使用Github Pages服务。
参考你的网页生成器的官方文档,新建项目文件夹,例如hexo init YourFolder, hugo new site YourFolder等命令。另外也需要阅读一遍你选择的主题模板的说明。
进入文件夹,新建一个本地Repo:
添加远程Repo(PC上)#
首先,添加github.com上的远程Repo。这里的origin是随后的,目标远程Repo的默认的简称:
添加VPS上的远程Repo。这里,如果你使用Hexo和部署插件hexo-deployer-git,只需要编辑Hexo配置文件_config.yml,再添加一个Repo:
deploy:

  - type: git
    repo: git@github.com:YourName/Repo.git
    branch: main
  - type: git
    repo: SubUser@YourHost:/home/git/com.Example.git
    branch: main
这样,在运行hexo deploy后,会同时上传public/里的内容,分别到github.com和VPS上的Repo。
没有专用的部署工具时,可采用手动的方法,以Hugo为例。编辑.git/config,在origin下面,额外加一个URL:
[remote "origin"]
    url = https://github.com/YourName/Repo.git
    fetch = +refs/heads/*:refs/remotes/origin/*
    url = SubUser@YourHost:/home/git/com.Example.git
    fetch = +refs/heads/*:refs/remotes/vps/*
这个操作实际上是添加了一个VPS上的远程Repo:
但是组合进了origin,使得运行git push -u origin main时,同时上传到两个Repo。
手动设置时,注意是否需要编辑.gitignore,来添加要忽略的文件和文件夹。
新建子用户#
回到VPS,新建上文提到的Repo。先添加一个SubUser(子用户),命名为git:
设置子用户的登录密码:
给予用户文件夹权限#
递归地给予git用户网页文件夹的权限:
为子用户开启SSH访问#
切换到git用户:
为子用户设置用以SSH访问的密钥:
粘贴PC上的C:\Users\YourName\.ssh\id_rsa.pub里的内容,保存并退出。
回到PC,测试以git账户登录VPS:
文件夹里新建Hook脚本#
VPS上安装Git:
在子用户的home/目录里,新建仅用以协作的Repo:
su git
cd ~
mkdir com.Example.git
cd com.Example.git
git config --global init.defaultBranch main
git init --bare
com.Example.git对应了com.Example。com.Example.SubDomain.git则对应com.Example.SubDomain。
新建Hook脚本:
粘贴进去:
#!/bin/bash -l
GIT_REPO=/home/git/com.Example.git
TMP_GIT_CLONE=/tmp/com.Example
PUBLIC_WWW=/var/www/html
rm -rf ${TMP_GIT_CLONE}
git clone $GIT_REPO $TMP_GIT_CLONE
rm -rf ${PUBLIC_WWW}/*
cp -rf ${TMP_GIT_CLONE}/BuildDir/* ${PUBLIC_WWW}
对应子域名是:
#!/bin/bash -l
GIT_REPO=/home/git/com.Example.SubDomain.git
TMP_GIT_CLONE=/tmp/com.Example.SubDomain
PUBLIC_WWW=/var/www/html/sub-domains/SubDomain/html
rm -rf ${TMP_GIT_CLONE}
git clone $GIT_REPO $TMP_GIT_CLONE
rm -rf ${PUBLIC_WWW}/*
cp -rf ${TMP_GIT_CLONE}/BuildDir/* ${PUBLIC_WWW}
这是一个只有变量和命令的Bash文件,也只涉及了简单的命令。基本上,你需要留意2-4行的变量的值,以及最后一行。在最后一行,BuildDir是网页文件所在的目录,常见的目录名有public、site、docs等。如果你在PC上运行过构建命令,如hexo build、hugo build,将会看见。
如果使用了hexo-deployer-git,这行自然是:
从本地Repo上传(PC上)#
运行了构建命名,生成了网页文件后,暂存当前目录和子目录的所有更改:
描述一下这次更改,准备好提交:
第一次提交时,需指定远程仓库名和分支名,加上-u origin main:
打开浏览器,访问Example.com,查看页面是否更新。
云端Build#
首先去取得「部署到Github Pages」的自动化脚本。
以Hugo站点为例,参考Host on GitHub Pages,在.github/workflows下新建hugo.yaml,或者重命名为deploy.yml。填入内容并保存。
复制这个文件,重命名新文件为deploy_cps.yml,编辑该文件。修改这里的--baseURL这行:
到:
对应子域名是:
参考SCP for GitHub Actions,替换Deployment job以下的内容为:
- name: Rename public to html
run: mv public html
- name: Copy file to server
uses: appleboy/scp-action@v0.1.7
with:
host: ${{ secrets.VPS_HOST }}
username: ${{ secrets.VPS_USERNAME }}
password: ${{ secrets.VPS_PASSWORD }}
port: ${{ secrets.VPS_PORT }}
source: "./html/*"
target: /var/www/
对应子域名是:
- name: Rename public to html
run: mv public html
- name: Copy file to server
uses: appleboy/scp-action@v0.1.7
with:
host: ${{ secrets.VPS_HOST }}
username: ${{ secrets.VPS_USERNAME }}
password: ${{ secrets.VPS_PASSWORD }}
port: ${{ secrets.VPS_PORT }}
source: "./html/*"
target: /var/www/sub-domains/SubDomain/
去到你在Github上的Repo → Settings → Secrets and variables → Actions → New repository secret → 依次创建脚本中写到的4个secret。Name和Secret分别为:
再举一个例子,在Material for MkDocs的Publishing your site部分,也提供了脚本,并且提示去看MkDocs文档来进行手动部署。新建deploy.yml后,再复制一份,重命名为deploy_cps.yml,修改deploy_cps.yml的:
到:
- run: mkdocs build --clean
- name: Rename site to html
run: mv site html
- name: Copy file to server
uses: appleboy/scp-action@v0.1.7
with:
host: ${{ secrets.VPS_HOST }}
username: ${{ secrets.VPS_USERNAME }}
password: ${{ secrets.VPS_PASSWORD }}
port: ${{ secrets.VPS_PORT }}
source: "./html/*"
target: /var/www/
两个例子的最后,上传你的脚本并测试。直接在主分支上进行测试不是一个规范的操作,但问题不大:
git add .github\workflows\deploy.yml .github\workflows\deploy_scp.yml
git commit -m "test deploy_scp"
git push
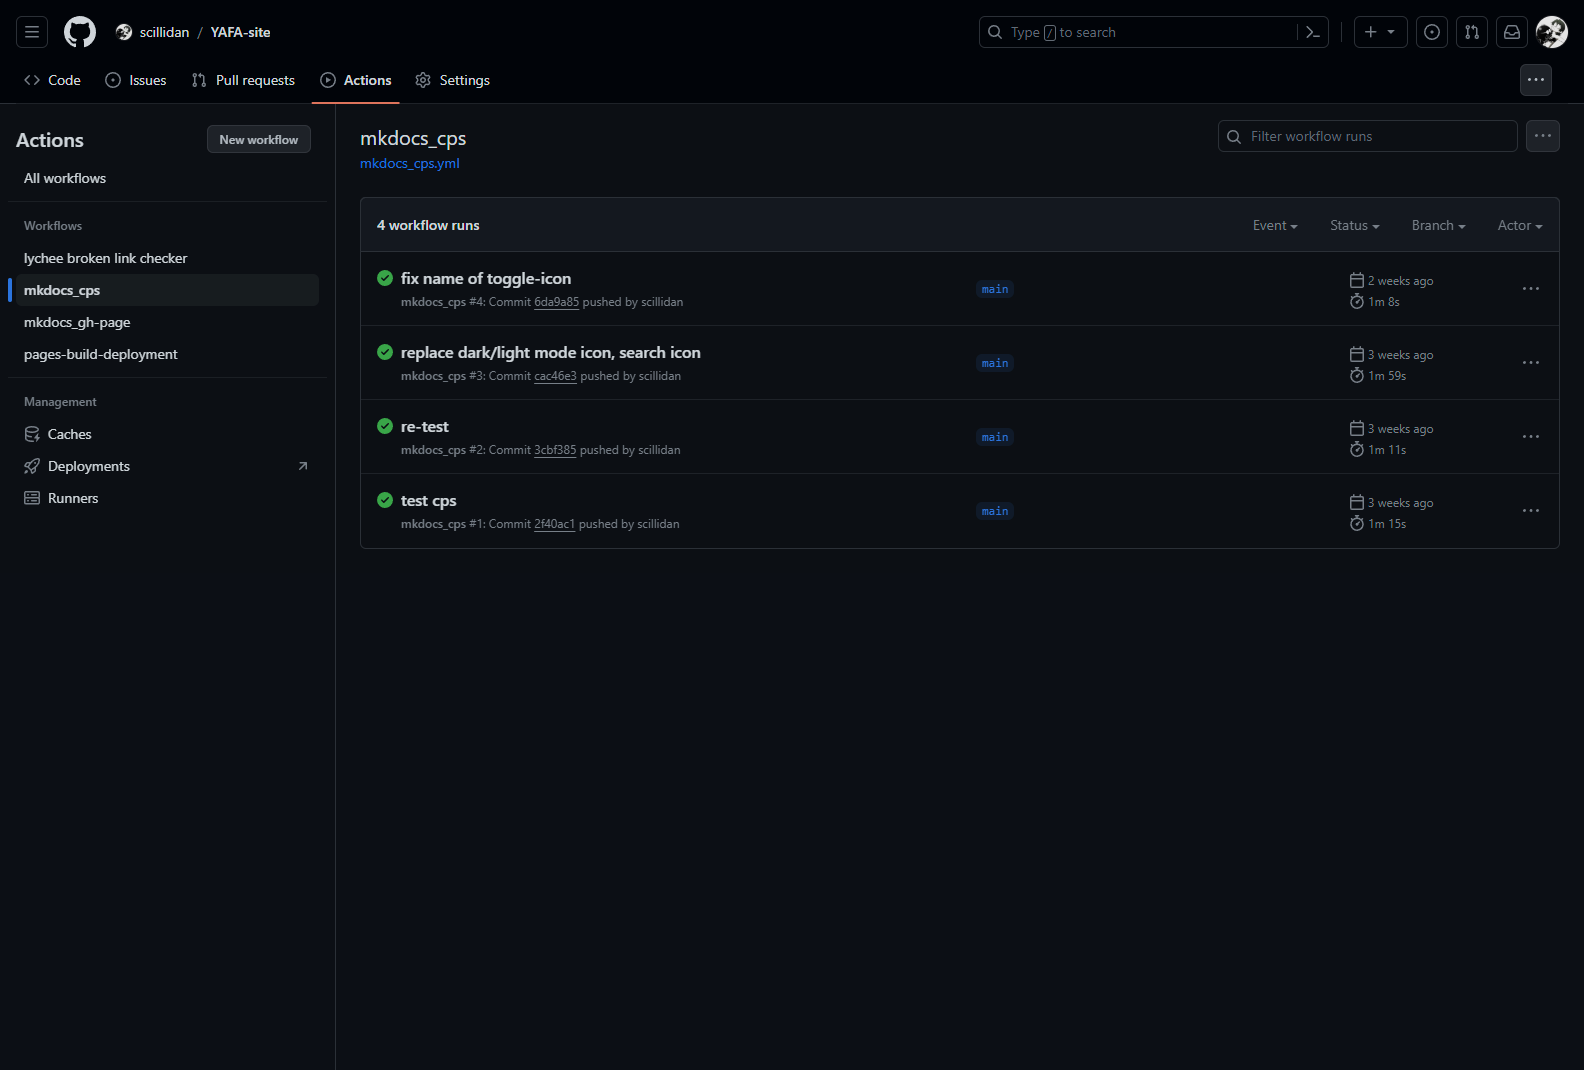
到你在Github上的Repo的Actions栏,观察运行情况。如果顺利的话,将看到:
如果你未看到有任何信息,可能需要检查:
- Setting → Pages → Build and deployment/Source → Github Actions …
- Actions → I understand my workflows, go ahead and enable them
Bug
后来,我重新处理、压缩了BYYA上的所有图片。因为我不熟悉Git的某些操作,我删除并重新上传了整个Repo,也就遇到了Issue #169中说明的问题。
小抄#
最后,是一份小抄。如果你需要在VPS上,添加一个子域名,依次:
<VirtualHost *:80>
ServerName SubDomain.Example.com
DocumentRoot /var/www/sub-domains/SubDomain/html
DirectoryIndex index.php index.htm index.html
CustomLog "/var/log/httpd/demo-access_log" combined
ErrorLog "/var/log/httpd/demo-error_log"
<Directory /var/www/sub-domains/SubDomain/html>
Options -ExecCGI -Indexes
AllowOverride None
Order deny,allow
Deny from all
Allow from all
Satisfy all
</Directory>
</VirtualHost>
mkdir -p /var/www/sub-domains/SubDomain/html
ln -s /etc/httpd/sites-available/com.Example.SubDomain /etc/httpd/sites-enabled/
systemctl restart httpd
打开浏览器,登录VPS的控制台,添加子域名的解析。
cd ~
mkdir com.Example.SubDomain.git
cd com.Example.SubDomain.git
git config --global init.defaultBranch main
git init --bare
cd hooks
touch post-receive
chmod +x post-receive
vi post-receive