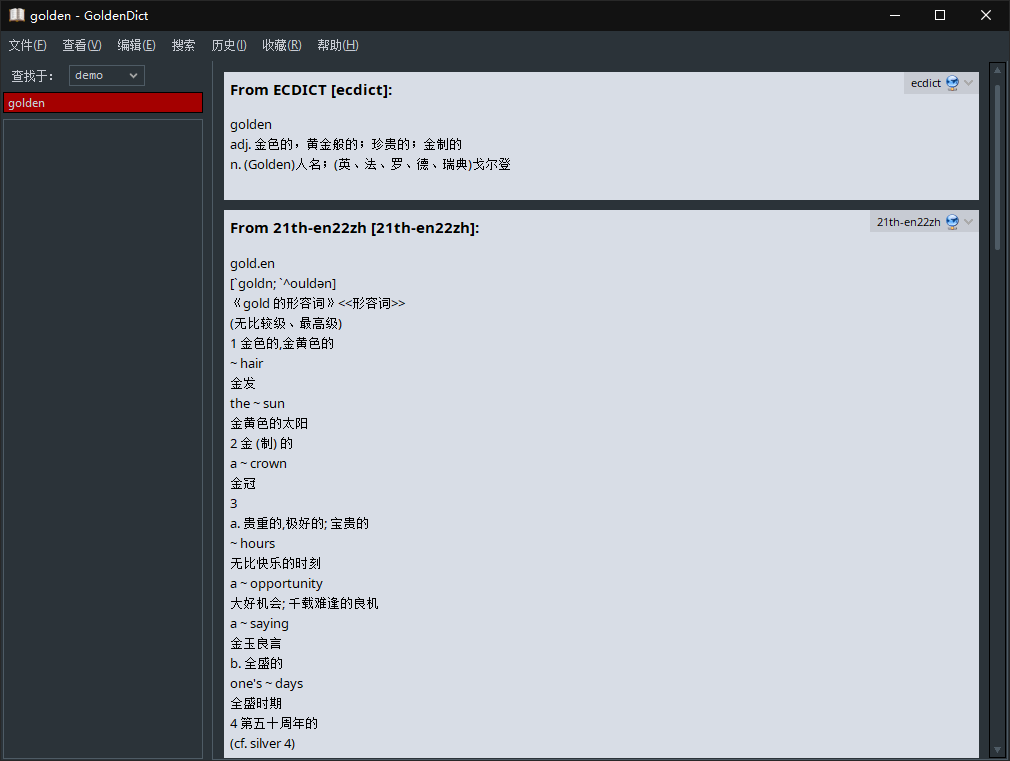
goldendict ex
词典服务和脚本#
DICT.org#
DICT.org是一个多语言、多词典在线词典平台。
GoldenDict → 编辑 → 词典 → 词典来源 → 词典服务器 → 添加:
dictd.service#
参考dictd.md部署自用dictd服务,笔记中使用的服务器硬件是运行Ubuntu Server for ARM 22.04的树莓派4(CM4)。dictd需要.dz等格式文件,可以查阅以下方法:
- 使用PyGlossary转换字典格式,
StarDict (.ifo)到DICT.org file format (.index)。StarDict的.ifo文件推荐以英文书写。 - 参考dict-ecdict.md来制作,这里需要dictzip或dictzip for Windows 10 (x64)。
词典来源 → 词典服务器 → 添加:
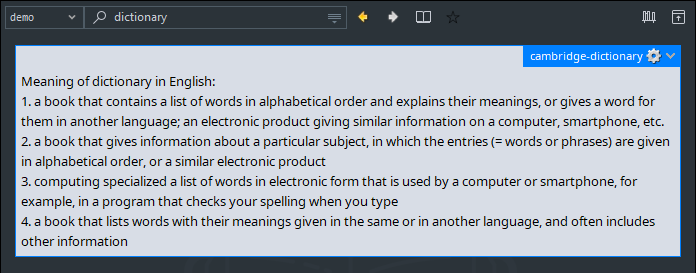
Cambridge-Dictionary#
Once you search for the word and gets the meaning, it saves it into a local database from which it retrieves them if you search for the same word again in the future instead of fetching it from the server. This makes it quick, run even when there’s no internet connection (assuming that your local database is of substantial size) and prevents making too many queries to the server.
“一旦您搜索该单词并获得其含义,它就会将其保存到本地数据库中,如果您将来再次搜索同一单词,而不是从服务器获取它,它就会从该数据库中检索它们。这使得它快速运行,即使没有互联网连接(假设您的本地数据库规模很大),并防止向服务器进行太多查询。”
git clone --depth=1 https://github.com/spignelon/cambridge-dictionary
cd cambridge-dictionary
uv venv
.venv\Scripts\activate.bat
uv pip install requests bs4
python cambridge.py "dictionary"
词典来源 → 程序 → 添加:
已启用 On
类型 纯文本
名称 `Cambridge-Dictionary`
命令行 `<path_to>\cambridge-dictionary\.venv\Scripts\python.exe <path_to>\cambridge-dictionary\cambridge.py "%GDWORD%"`
翻译脚本和服务#
tencent_trans_zh.py#
这是我使用了两年以上,最近经过AI重写的一个脚本,主要用于将多语言(主要是英语)翻译到中文,中文翻译到英文。
- 如何申请或创建API请看腾讯云机器翻译的官网介绍。API的文本翻译一项每月有500万字符免费额度,重度使用也完全够用。我在字幕机翻、Translate Shell里也都使用过。
- 设置系统环境变量,可以使用环境变量编辑器Rapid Environment Editor:
- RapidEE → 用户变量 → 右键 → 添加环境变量 → 变量名称
TENCENT_SECRET_ID→ 填写你的SecretId - 添加环境变量 → 变量名称
TENCENT_SECRET_KEY→ 填写你的SecretKey
https://raw.githubusercontent.com/scillidan/Shell/refs/heads/main/lib/python/tencent_trans_zh.py
uv run tencent_trans_zh.py "Golden apple"
词典来源 → 程序 → 添加:
![]()
deep-translator#
deep-translator是一个支持了多引擎的翻译脚本工具。
git clone --depth=1 https://github.com/nidhaloff/deep-translator
cd deep-translator
uv venv
uv pip install -e .
deep-translator --translator <translator> --source "en" --target "zh" --text "Golden apple"
有些翻译器,支持检查源语言,然后都需要指明目标语言。但我需要「中英文互译」,有一个可行的方法是:在GoldenDict中添加两条脚本设置,其中一条的输入语言为en,目标语言为zh。
词典来源 → 程序 → 添加:
类型 纯文本
名称 `deep-translator en2zh`
命令行 `<path_to>\deep-translator\.venv\Scripts\deep-translator.exe --translator <translator> --source "en" --target "zh" --text "%GDWORD%"`
另一条则将两者互换,即--target "zh" --source "en"。
![]()
golden-dict-trans#
golden-dict-trans是一个谷歌翻译专用脚本,可检测输入语言,将中文翻译到英文,或者将多语言翻译到中文,并提供干净的HTML格式输出。
scoop install uv
git clone --depth=1 https://github.com/xiaodaxia-2008/golden-dict-trans
cd golden-dict-trans
uv run translate.py "Golden apple"
词典来源 → 程序 → 添加:
如果不想显示标题,可注释掉translate.py里的这行:
![]()
LibreTranslate#
LibreTranslate是一个开源、有离线功能的机器翻译API。它被设计用于本地托管,允许用户在不依赖其他外部服务的情况下进行翻译,安装简单,高效经济。可作为一种备用。
可参考libretranslate.md部署到家用服务器,并参考libretrans.md来使用。
![]()
它的翻译效果通常逊于云端机器翻译。在我的印象里,它曾在一篇上下文里,将「Firefox Nightly」翻译成「火狐夜总会」。目前,我在浏览器插件Linguist和Arch系统的GoldenDict里使用它。
ollama_trans.py#
Translate Non-Chinese to Chinese or translate Chinese to English with Ollama.
- ollama_trans.py
目前只试用过模型llama3.1:8b,qwen3:14b。 - ollama_trans_gemma3_translator.py
模型gemma3-translator的专用脚本,也是我目前使用的。
uv run ollama_trans.py --model llama3.1:8b "<text>"
uv run ollama_trans.py --model qwen3:14b --think true --hidethinking "<text>"
uv run ollama_trans_gemma3_translator.py "<text>"
词典来源 → 程序 → 添加:
![]()
如果类型选择纯文本,则需要额外加上--utf16。
分词断句脚本#
gd-mecab(仅gd-ng)#
GoldenDict tools是一套GoldenDict-ng的增强脚本集,主要用于日语学习。它的gd-marisa、gd-mecab脚本,可以置顶句子、分词、断句。似乎也能用于中文,但并没有实际的「中文分词」的功能,可以用「划词再右键」来代替。
目前不支持Windows,可参考issue #18,下载gd-tools_windows.zip,解压后运行安装包。
务必留意!这里需要安装,而且没有安装文件的构建流程和源代码可查看。出于一些好习惯,当安装程序或可执行程序不是从SourceForge等可信发行网站提供时,务必进行杀毒扫描,或上传到VirusTotal进行Hash检查。虽然从Github的Releases板块下载时,也有小几率报毒,但公开的代码、构建流程等都降低了中毒风险。
当时,这个安装包有几个由VirusTotal检查的红色警告,我在HiBit Uninstaller的「安装监视程序」模式下,进行了安装。当你下载后,务必用有效的杀毒工具重新检查。
词典来源 → 程序 → 添加:
类型 Html
名称 `gd-marisa`
命令行 `<path_to>\Ajatt-tools\gd-tools\gd-tools.exe marisa --word %GDWORD% --sentence %GDSEARCH% --path-to-dic <path_to>\Ajatt-tools\gd-tools\marisa_words.dic`
Sentences#
This command line utility will convert a blob of text into a list of sentences.
“此命令行实用程序将文本块转换为句子列表。”
pnpm add -g echo-cli
# Test on go1.20.1
go get github.com/neurosnap/sentences
go install github.com/neurosnap/sentences/cmd/sentences@latest
词典来源 → 程序 → 添加:
类型 纯文本
名称 `Sentences`
命令行 `C:\Users\User\AppData\Roaming\pnpm\echo-cli.CMD "%GDWORD%" | sentences.exe`
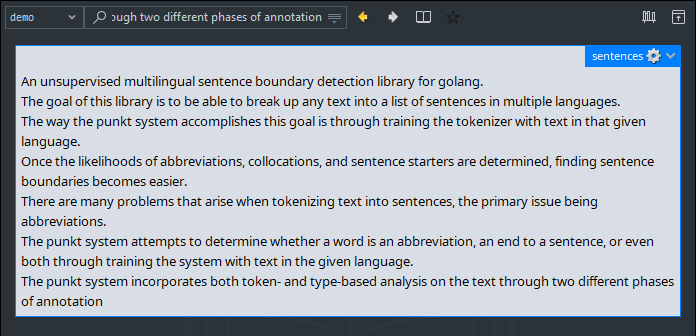
并没有用来解决GoldenDict会删除换行符的问题。
语法检查服务和脚本#
在查词的功能上,有了翻译脚本就能够处理句子。同样的,在对单词可做拼写检查外,也就需要语法检查工具来处理句子。
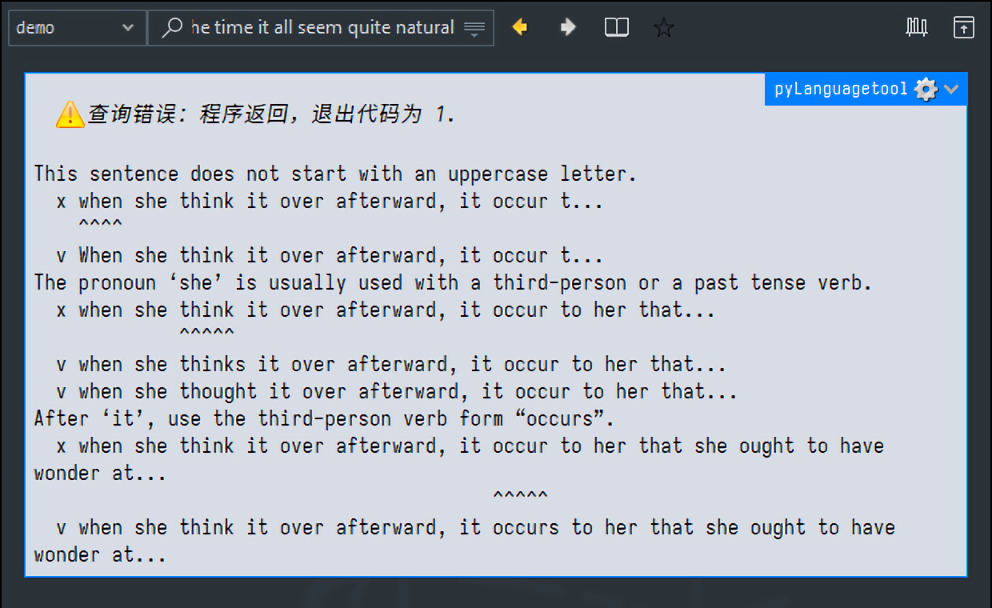
pyLanguagetool#
LanguageTool是一个开源的多语言的拼写、语法、风格检查工具。在它的浏览器插件里,可切换服务源,从「云服务」切换到「本地服务」。作为服务应用,Java有很好的兼容性,但能效方面可能并不出色。
作为一个外部工具,可以参考languagetool.md来部署LanguageTool服务。
我还有不少不在浏览器里编辑或者划句的场景。我尝试了在GoldenDict里对句子做语法检查,这种方法实际用起来却不太直观。而且在Windows的GoldenDict里去使用一些命令行工具,还可能会遇到字符相关问题。
目前,我使用的是一个设置为开机启动的AutoHotkey脚本user.ahk:
#NoEnv
SetWorkingDir %A_ScriptDir%
^!+c::Run "<path_to>/grammer_check.cmd" --api-url http://<your_host>:8040/v2/
这样,当我复制一段文本后按下Ctrl+Shift+Alt+c, 就会运行grammer_check.cmd:
@echo off

<path_to>\.pyLanguagetool\Scripts\pylanguagetool.exe --input-type html --lang en-US -c

pause
这里,pyLanguagetool是一个Python库和命令行工具,使用LanguageTool的JSON API。
uv venv .pyLanguagetool
.pyLanguagetool\Scripts\activate.bat
uv pip install --upgrade setuptools beautifulsoup4 pyLanguagetool
echo "This are a exampl" | pylanguagetool --lang en-US
文本转语音脚本#
edge-tts#
edge-tts是一个Python库,让你无需安装Microsoft Edge或Windows系统,也无需API密钥,即可使用微软Edge的在线文本转语音服务。
edge-tts --list-voices
edge-playback --voice en-US-AndrewMultilingualNeural --text "Alice was beginning to get very tired of sitting by her sister on the bank, and of having nothing to do: once or twice she had peeped into the book her sister was reading, but it had no pictures or conversations in it, “and what is the use of a book,” thought Alice “without pictures or conversations?”"
词典来源 → 程序 → 添加:
piper#
在电子书管理工具Calibre的阅读器里,可以选择piper作为朗读语音。它是快速、本地的神经网络TTS系统。
uv tool install piper
wget https://huggingface.co/rhasspy/piper-voices/blob/main/en/en_US/libritts_r/medium/en_US-libritts_r-medium.onnx
wget https://huggingface.co/rhasspy/piper-voices/blob/main/en/en_US/libritts_r/medium/en_US-libritts_r-medium.onnx.json
piper -m en_US-libritts_r-medium.onnx -- "this is a text"
# https://github.com/OHF-Voice/piper1-gpl/issues/149
piper -m en_US-libritts_r-medium.onnx --output_raw -- "this is a text" | ffplay -nodisp -autoexit -f s16le -ar 22050 -ch_layout mono -
创建一个_piper.bat:
echo %* | piper -m <path_to>\en_US-libritts_r-medium.onnx --output-raw | ffplay -nodisp -autoexit -f s16le -ar 22050 -ch_layout mono -i -
词典来源 → 程序 → 添加:
也可以使用Windows text-to-speech。
git clone --depth=1 https://github.com/Lej77/windows-text-to-speech
cargo build --release --workspace
cd %CARGO_TARGET_DIR%\release
windows_tts_engine_installer.exe
# windows_tts_engine_installer.exe --uninstall
词典来源 → 语音合成 → 可用语音引擎 → Lej77 - Piper - Multilingual → 添加 → Apply
其他脚本或程序#
添加到「程序」里即可:

ety-python#
ety-python是一个Python工具,能够打印词源的各历史时期的树状信息图,数据来自Etymological Wordnet项目,大部分信息是从Wiktionary挖掘来。
将输出:
当它在Windows 10的GoldenDict里运行时,会出现编码问题,(可能)见issue #1678, blog。
Web应用#
一些相关的Web应用:
- AllAcronyms
专用于查找、解释各种缩略词和缩写,涵盖科技、医疗、商业等多个领域。 - SKELL
提供词语的大量常见搭配、例句,支持多语言。 - wordnik
在线英语词典,汇集了尽可能多的单词、同义,提供定义、同义词,和例句、词源、相关词汇等。 - ConceptNet
“ConceptNet是一个免费可用的语义网络,旨在帮助计算机理解人们使用的单词的含义。” - BabelNet
“每个BabelNet同义词集代表一个给定的含义,并包含用一系列不同语言表达该含义的所有同义词。” - OpenHowNet
“OpenHowNet源自在中文世界有巨大影响力的语言知识库——知网(HowNet)。知网的构建秉承还原论思想,即所有词语的含义可以由更小的语义单位构成,而这种语义单位被称为“义原”(Sememe),即最基本的、不宜再分割的最小语义单位。”
不过我目前不在GoldenDict里使用Web字典。我在Windows上使用启动器Keypirinha的官方软件包WebSearch或者第三方软件包EasySearch,在Arch上使用Rofi的脚本web-search.sh来运行搜索。添加如下内容到配置文件或脚本文件:
websearch.ini:
[site/allacronyms.com]
url = https://www.allacronyms.com/aa-searchme?q=%s

[site/skell.sketchengine.eu]
url = https://skell.sketchengine.eu/#result?lang=en&f=concordance&query=%s

easysearch.ini,可设置专门的别名,但输入应为URL编码格式,如可以使用+表示空格:

web-search.sh:
URLS=(
  ["allacronyms.com"]="https://www.allacronyms.com/aa-searchme?q="
  ["skell.sketchengine.eu"]="https://skell.sketchengine.eu/#result?lang=en&f=concordance&query="
)

OCR取词#
Capture2Text#
使用到GoldenDictOCR,在它「OCR取词」模式下,按Ctrl+右键单击可识别鼠标附近字符,按Ctrl+反引号可进行框选。
- 安装OCR工具Capture2Text
- 默认OCR语言为英语,可参考Installing Additional OCR Languages添加语言
- 进入
GoldenDictOCR\IncludeAHK\ - 编辑
GdOcrTool.ahk。补全Capture2Text.exe的完整路径 - 按
Ctrl+Alt+O开关一次「OCR取词」 - 打开配置文件示例
Capture2Text.ini,复制从[BubbleCapture]到[Hotkey]的内容 - 编辑
C:\Users\User\AppData\Roaming\Capture2Text\Capture2Text.ini,在文件末尾,粘贴复制的内容 - 编辑以下两处,用于设置3个快捷键,来切换到对应的识别语言,如:
[Hotkey]
Lang1=Shift+Alt+1
Lang2=Shift+Alt+2
Lang3=Shift+Alt+3
...
[OCR]
QuickAccessLang1=English
QuickAccessLang2=...
QuickAccessLang3=...
用来识别印刷体的单个英文词时,识别率还可以,稳定性略差。
Umi-OCR#
Umi-OCR是一款开源、可离线、功能灵活的OCR软件。用于一般OCR时,它可提供高速稳定、准确率较高的中英文混合识别。
在V1版本里,可配置一组快捷键,在OCR后触发GoldenDict查词,即「截图联动」。
对于V2版本,或者说更通用的情况(且不限于Umi-OCR)是,只需勾选「复制OCR结果」,在进行OCR后,再按下GoldenDict查词快捷键就可以了。配置步骤:
Umi-OCR → 添加 → 截图OCR → 设置 → 识图后的操作 → 复制结果 (On)
键位设置#
我在查字的字典组外,还有一个查句子的组translate:
所以我目前使用goldendict_search_in_group.ahk.
GoldenDict → 首选项 → 热键 → 使用下列热键翻译剪切板中的单词 (Off)